How to Take a Screenshot on Mac: Quick Guide 2024, A Beginner’s Guide to Screenshots for Mac Users
In today’s digital landscape, the capacity to capture and transmit visual material without interruption is critical. Knowing how to snap a screenshot is useful when showing a presentation, debugging software bugs, or sharing hilarious events. Fortunately, Mac users can use Apple’s excellent screenshot capabilities. In this beginner’s guide, we’ll go over everything you need to know to become a screenshot pro on Mac. We’ve got you covered on everything from the fundamentals to advanced skills. So how to take a screenshot on mac let’s get started!
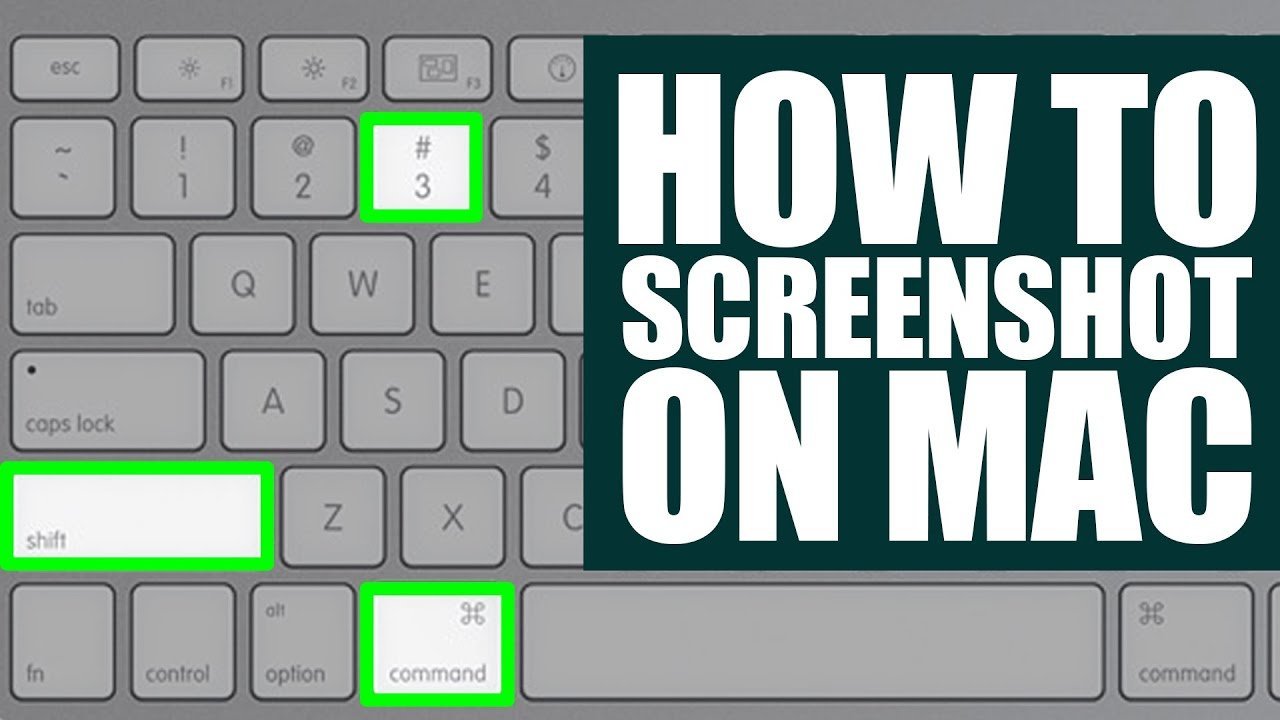
1. Use Keyboard Shortcuts:
To get full screen, concurrently press Command + Shift + 3. Your Mac will capture the full screen and store it as a file to your desktop.
Select: Press Command + Shift + 4. Your cursor will change into a crosshair. Click and drag to pick the area you wish to record. Once you release the mouse button, your Mac will capture that section of the screen.
Window: Press Command + Shift + 4, followed by the Spacebar. Your cursor will change to the camera icon. Click on the window you want to capture, and your Mac will only capture that one.
2. Use the Screenshot Utility:To launch the Screenshot utility, press Command + Shift + 5.Select the desired capture option from the toolbar at the bottom of the screen. The options include capturing the full screen, a specific area, a window, or recording the screen.After capturing, a snapshot preview will appear in the lower right corner of your screen. Click it to modify or share your screenshot.
3. Tip and Tricks:To annotate your snapshot, simply click on the preview and choose the Markup tool.
Change the default save place by launching the Screenshot application, going to “Options,” and selecting your preferred save location.If you require more advanced editing and sharing options, use third-party programs.
4. Troubleshooting:If your Mac does not capture screenshots, make sure you have enough storage space available.Check your keyboard shortcuts in System Preferences > Keyboard > Shortcuts to ensure they don’t conflict with any other instructions.
Taking screenshots on your Mac is not only useful, but also enjoyable. With three simple steps, you’ll be capturing and sharing screenshots like a pro in no time. Experiment with different choices to see what works best for you and maximize the power of visual communication on your Mac.
B. Screenshot Utility.
The Screenshot Utility offers a simple interface for taking, editing, and sharing screenshots on your Mac. It provides a variety of capture choices, such as capturing the entire screen, a selected area, a specific window, or even recording the screen. To access it, press Command + Shift + 5.
C. Touch Bar Method (if applicable)
Apple has put a simple screenshot tool directly into the MacBook Pro’s Touch Bar. Simply pressing the Touch ID button will bring up the Control Strip, which includes a screenshot button. Tap it to see options for recording the entire screen, a specified portion, or a single window. This solution provides quick and easy access to screenshot functionality directly from your Touch Bar.
What You Will Learn From This Guide
- Learn how to utilize keyboard keys to capture the entire screen, a single window, or a custom selection.
- How to use the Screenshot application to capture, modify, and share screenshots easily.
- How to use the Touch Bar on MacBook Pro models to capture screenshots rapidly.
- Tips and strategies for annotating, organizing, and sharing screenshots efficiently.
- Troubleshooting typical problems and overcoming challenges along the way.
By the end of this course, you’ll have all the information and abilities you need to take, edit, and share screenshots on your Mac like a pro. Whether you’re a student, a professional, or simply someone who enjoys sharing intriguing things with others.